Tuesday, December 14, 2010

I Spy Bags


I made these fun I Spy Bags for my son's friends for Christmas gifts these years. The were a big hit! I am going to make some more for the cousins too. Everyone seems to love these and they were easy to make too.
Posted by Picasa

Recipe Holder


I needed a few last minute Christmas gifts and came up with this. A few recipe holder held on by a fun magnet. I think the turned out really nice looking and I was able to make them for about $10 each.
Posted by Picasa

Wednesday, May 26, 2010

Beach party Cake/cupcakes


For my sons second birthday we did a beach party theme. So I decorated these cupcakes and cake with blue frosting for water, crunched up Nilla Wafers, gummies and little drink umbrellas too! Everyone enjoyed them and they looked really good!
 
Posted by Picasa

Capri Sun Bags


1. Buy two/three boxes of Capri Sun drink pouches and drink them.
2. Soak the juice pouches in soapy water to help clean them. Remove the excess liquid from the pouches. Get a dish towel and a rolling pin. Place the towel on a table and put the drink pouch on top of it. Roll the drink pouch flat like you would pizza dough. You need to drink and flatten out approximately 30-40 pouches (depending on the size).
3. Piece together the pattern of the purse. With a sewing machine, sew three/four pouches with the bottom of the pouch to the top of another pouch. This will be the bottom of the purse.
 

4. Sew the pouches together side by side. Repeat that step for the other side of the purse.
5. Sew each side to the middle two pieces of the bottom.
 

6. Bend the end pieces of the bottom up to meet the sides of the purse. Sew the seams closed. This creates a box of Capri Sun.
7. Sew the last remaining pouches together, just like the sides of the purse.
8. Use a ribbon or fabric to make a strap and put snaps on the flap to close the purse.

I also used pouches to make a pocket on the inside and outside of the big bag and an inside pocket on the smaller pink one.

Monday, March 1, 2010

St. Patrick Day Ideas


Leprechaun Trap
MATERIALS:
Oatmeal Container
Felt, Construction Paper, or Craft Foam
Glue
Scissor
Straws
Clay or Play Doh
Gold Candy Coins
INSTRUCTIONS:
(1) Gather all of the materials that you need to make this Leprechaun Trap Craft Idea. You will need to find Oatmeal Container, Felt, Construction Paper, or Craft Foam, Glue, Scissor, Straws, Clay or Play Doh, and Gold Candy Coins.
(2) Take the oatmeal container cap and cut a rectangle hole into it.
(3) Now glue construction paper, felt, or craft foam all around the rectangular hole. But, don't cover the hole.
(4) Now cut out a rectangle just a tiny bit bigger than the hole. Don't glue it on. If the leprechaun steps on this hole, he will fall through.
(5) Now wrap felt, craft foam, or construction paper around the cylinder container.
(6) Now cut out a circle twice as big as the oatmeal container and glue it to the bottom of the container.
(7) Cut out a black band and a yellow square with a tiny square hole in the center and glue it to the bottom of the hat like the picture above.
(8) Now take the straws and glue them together to look like the ladder you see above.
(9) Place coins lightly on the trap door. Don't put too many or they will be too heavy and they will fall through the trap door.
(10) Make a rainbow out of clay or play doh and put it on top of the hat to attract the Leprechaun. I hope you catch that Leprechaun. Happy Saint Patty's Day!!


The WEE little Leprechaun
Materials
Toilet paper tube
Green craft foam
Acrylic paints: green, skin-tone, pink, and brown
Black permanent marker
Tacky glue
4 brown pipe cleaners
Decorative button
Instructions
For this crafty little decoration, first trace around the end of a toilet paper tube onto a piece of green craft foam.

(1)Draw a 2 1/2-inch circle around the first circle, then cut them both out to create a hat top and brim and set them aside.
(2)Next, using acrylic paints, paint the paper tube green. Add a skin-tone face and hands, plus rosy cheeks, as well as a band of brown paint around the back for hair.
(3)Once the paint has dried, use a permanent marker to draw on facial and clothing details, then use tacky glue to stick on 3 coiled brown pipe cleaners: 2 in the back for hair and 1 around the face for a beard. For feet, fold another pipe cleaner in half, then tightly coil and pinch the ends, as shown.
(4)Place the folded pipe cleaner inside the tube and glue the feet to the edge. Glue on the hat top and brim and a 5 1/2- by 1/2-inch strip of craft foam for arms.
(5)Finally, glue a decorative button to the hat brim.


Leprechaun House
Materials:
green craft foam
green glitter
shamrock stickers
imagination!
Instructions
(1) Think rainbows! Rainbow crafts are adorable for St. Patty's Day and are easy to make using any available craft supplies. Don't forget the pot of gold at the end! Colored sidewalk chalk on black construction paper is one way to create fun rainbows for St. Patrick's Day.
(2) Leprechaun hats are another easy St. Patrick's Day craft idea and can be assembled with green craft foam. You'll need three pieces for the bottom, sides, and top. Add a black buckle and green glitter details.
(3) Consider pre-assembled St. Patrick's Day craft kits. Companies like Oriental Trading are a great place to check for kits (like the Leprechaun Cottage, pictured) that are inexpensive and easy.
(4) Four-leaf clovers are another fun craft idea. Have kids go on a four-leaf clover hunt, also collecting some three-leaf clovers. Press the flowers for a few days until they are dry, and kids can make lucky shamrock pictures.

Thursday, February 18, 2010

Marshmallow Fondant

MM or Marshmallow Fondant is easy to make and to use. Here is the recipe that I use! It is sticky but adds just a little bit of fanciness to a cake.

Makes: Enough to cover 2 cakes Total Time: 30 min

what you need
•1 bag of mini marshmallows
•1 (2lb) bag powdered sugar
•1/2-2 T Water
•1/2 cup solid vegetable shortening
Make it
First cover a thick layer of veggie shortening on the counter where you will be working. Then pour 1/2 of the powdered sugar onto of the greased area. Melt marshmallows and tablespoons of water in a microwave: Put the bowl in the microwave for 30 seconds, open microwave and stir, back in microwave for 30 seconds more, open microwave and stir again, and continue doing this until melted. It usually takes about 2 minutes total. Pour the melted marshmallow on top of the pile of powdered sugar.

Now grease your hands GENEROUSLY (palms, backs, and in between fingers).
Start kneading like you would bread dough. You will immediately see why you have greased your hands.

Keep kneading, this stuff is sticky at this stage! Add more powdered sugar as you good and knead some more. Re-grease your hands as needed. If the mix is tearing easily, it is to dry, so add water (about 1/2 tablespoon at a time and then knead it in). It usually takes me about 8 minutes to get a firm smooth elastic ball so that it will stretch without tearing when you apply it to the cake.

It is best if you can let it sit, double wrapped, overnight (but you can use it right away if there are no tiny bits of dry powdered sugar). If you do see them, you will need to knead and maybe add a few more drops of water.

Prepare the fondant for storing by coating it with a good layer of veggie shortening, wrap in a plastic-type wrap product and then put it in a re-sealable or Ziploc bag. Squeeze out as much air as possible.

MM Fondant will hold very well in the refrigerator for weeks. If I know that I have a cake to decorate, I usually make two (2) batches on a free night during the week so it is ready when I need it. Take advantage of the fact that this fondant can be prepared well in advance

Sunday, February 14, 2010

Valentine Craft


These are two little Valentine craft I did right before Valentines. I first made a valentine heart with an arrow through it and then painted it. I used my cricut and cut out the word Love and then placed it on the heart. Kind of cut I think. Next I did this fun love collage as a gift for my hubby. I had such fun making this project. It was so fun to find my old wedding pictures and then to write an article about our wedding morning in a personalized newspaper. I got this great idea from a blog called mod podge rocks. Happy Valentines!

Tuesday, January 26, 2010

Football Fun

Football wall game

What You Need
Poster board
Brown card stock
White opaque paint marker
Poster tacks
Blindfold
Instructions
For the game pieces, first create a goal post from two-inch-wide strips of poster board. (The uprights and the crossbar are each 20 inches long, and the post is 6 inches tall.) We attached ours to the wall using poster tack.

For the footballs, cut 5-inch-long shapes out of brown card stock. We found some in the scrapbook aisle of our craft store that looks like football leather. Use a white opaque paint marker to decorate and add players' names to the footballs. Put a blob of poster tack on the back of each one.

Players line up about six feet away from the goal. One at a time, each player is blindfolded, spun around three times by another person, and set loose to try to stick their football between the uprights. (No reaching out your empty hand to feel the wall.) Play several rounds with 3 points awarded for each field goal. Highest score wins.

Football Floor Pad

Materials
Scissors
1/2 yard of brown vinyl
12- by 20-inch piece of 1-inch-thick high-density foam (available at fabric stores)
Hot glue
Clothespins
2 yards of 1/2-inch-thick white twill tape
Instructions
Cut two 22- by 14-inch football shapes from the vinyl. Then cut out a foam football that's an inch smaller all around and sandwich it between the vinyl pieces.
Hot-glue the vinyl edges together, using clothespins to hold them in place while the glue dries.
Glue on pieces of twill tape for laces, as shown

Yummy Football Cupcake

Just make a cupcake and decorate it with green frosting and then put white stripes across like lines. Make a flag using a stick pretzel and cut a flag out of fruit roll ups. The football is a chocolate almond with white frosting on them.

Football Game made out with a pencil

Materials
Oval bead (ours was 3⁄4 inch long)
Brown and white acrylic paint
Scissors
2 flexible straws
Unsharpened pencil
Green floral tape
Glue
2 small pom-poms
String
Instructions
First paint the bead with brown and white acrylic paint to resemble a football, and allow it to dry.

Cut a 6-inch section from the top of each of the flexible straws. Secure the longer ends of the straw pieces together by cutting a slit in one straw and slipping the other one inside it.

Secure the midsection of the straws to the eraser end of an unsharpened pencil with green floral tape, then bend the ends to form a U. Glue 2 small pom-poms to the ends of the straws and let the glue dry.

Tie the football bead to one end of a 12-inch length of string and tape the other end to the pencil, about 2 1⁄2 inches up from the bottom. Cover the rest of the pencil with more floral tape. To play, try swinging the football through the uprights to score a field goal

More Valentine's crafts

Blast-off Rocket Candy Card

Materials
Scissors
Lightweight colored paper for the body and the flame (we used a 3 1/4-inch pink square for the body and a 3-inch orange square for the flame)
Double-stick tape
A roll of round candies (we used Life Savers candy)
A foil-wrapped Hershey's Kiss
Marker
Instructions
For the body, cut the paper to fit around the roll of candy, including a bit of overlap. Tape the paper to the roll.

Cut the tail flames and include a 1/4-inch tab, as shown below. Snip the tab in half along the solid line, fold the 2 flaps in opposite directions, and tape the flame to one end of the candy roll.

Tape a wrapped chocolate kiss to the other end.

Use a marker to write your message on the rocket or the flames.

Tips: Write the recipient's name on the flames shooting out the back.

Valentine's Mail Box


Materials Needed:
Empty laundry detergent box
White contact paper
Stencils
Valentine cut-outs
Velcro dots
Hot glue gun
Instructions:
Apply white contact paper onto the box. Add heart decorations by using hot glue. Use stencils if desired. Add velcro dot under the heart for box closure.

Valentine Tic Tac Toe

Supplies:
* poster board - white, red, or pink
* black marker
* red & pink felt, 3 squares each
* dry beans - any kind or size
* sewing machine or hot glue gun

Step 1:
Fold your poster board in half. Then cut a large heart out. Get it as big as you can. Then open it up and draw in your lines. You'll need two vertical and two horizontal lines. Use a pencil to make the lines first, then trace over it with a black marker. I used the extra piece of poster board left over to make nice straight lines.

Use heart paper or flat felt hearts, but bean bags are much more fun to play with.) You should be able to get 4 flat felt hearts out of each felt square.
Then place two together and sew or hot glue around, Hot Glued Hearts tutorial. I like to use a zig zag stitch when sewing, making it pretty or you could use pinking shears for a pretty edge as well. Make sure to leave at least an inch of space to fill in with the dry beans.

Now fill your bags about half way full with beans. You want to be able to close that small hole and sew or glue it together, and if there are too many beans, it will be hard to seal it shut.


Valentine Door Decoration

What you'll need:
1-2 pieces of red craft foam
1 piece of white craft foam
1 piece of pink craft foam
White ribbon
3 jingle bells
Hole punch
Glue
Heart Template
Letter Templates
Instructions:
Print out the template and cut out the pieces. Trace the heart shape onto red craft foam. You will need 4 red hearts. Trace the letters "L" and "V" onto white craft foam and the "O" and "E" onto pink craft foam. Cut out all of these pieces.
Glue one letter onto each heart.
Punch a hole in the top and bottom of each heart (in the center of the top of the heart and the center of the very bottom of the heart).
Cut small pieces of ribbon (3-4 inches) and use the ribbon to tie the bottom of one heart to the top of the next in order so you spell out the word "LOVE". At the top of the "L" heart use a longer piece of ribbon to use as a hanger. At the bottom of the "E" heart thread 3 jingle bells onto the ribbon and then tie it onto the heart.
Hang your craft on the door

Valentine Picture Frame Craft

I LOVE YOU TO PIECES!


What you'll need:

* Unfinished puzzle pieces (*Note: these can be found in most craft stores. They are originally intended to be turned into invitations and mailed out, so they are often with the card making or cardstock materials. If you can’t find them, you could use pieces from an old puzzle instead.)
* Red, white and pink craft paint
* Paint brush
* Tongue depressors
* Glue
* Black marker
* Photo

How to make your Picture Holder Craft
If using the unfinished puzzle, remove the center four pieces. Snap apart the remaining pieces. Paint the pieces red, pink or white.
While the pieces dry, assemble your tongue depressors into a frame shape as shown in the photos. Glue them together.
When the puzzle pieces are dry, assemble them back together (roughly) and glue them down to the tongue depressor frame as you go. This takes a good bit of glue.
When you get all the pieces assembled, use the marker and write “I Love You To Pieces” along the bottom of the frame.
Add in a photo of your child.

Valentine's fun Ideas


Take a little tuna fish can and cover it with spray paint and paper. Hot glue plastic pony beads all the way around the side and run a yarn through the beads and you have a little drum. Be sure to use a safety can opener so that there are no sharp edges and the top of the can works as a lid. I think it would be best to package the candy in little clear bags so the candy doesn’t take on any odd tastes from the can.

These fun whirly things or helicopters are great fun especially for boys. Use card stock to help keep it from being torn apart to quickly.

These suckers are fun and a yummy treat to give out to your little ones friends for Valentines!

I love these little alligators. You could make these and then fill them with treats! Add some googly eyes for some extra fun!

Valentine Mini-Cheese Cake


Mini Heart Chocolate Cheesecakes

You will need

Crust

½ Cup chocolate graham cracker crumbs

(1 pack of the 3 pack box yields 1 cup)

2 Tbs butter, melted

1 ½ Tbs sugar

1 pinch of salt

Filling

¾ Cup semi-sweet chocolate chips

8 oz. Cream cheese (softened)

½ Cup sugar

2 eggs

½ Cup sour cream

½ tsp. Vanilla extract

Have all ingredients at room temperature. Preheat oven to 325 degrees. Lightly spray pan, especially the sides. You probably could make these in a mini-muffin pan—-but this pan has removable heart disc bottoms that make it a breeze to remove the cheesecakes.

To make the crusts, combine cookie crumbs, butter, sugar and salt and mix until well blended. Divide the mixture between the hearts. Press evenly into the bottom of each well. It is about a tablespoon of mixture in each well. Bake crusts for 10 minutes. Cool completely on a wire rack.

Reduce oven temperature to 275 degrees.

Melt chocolate (I use the microwave). I process in my food processor or with a mixer the cream cheese and sugar until smooth—-stop occasionally to scrape down the sides of the bowl. Add the sour cream and vanilla and blend. Add the eggs one at a time blending after each egg. Add the melted chocolate and beat until completely blended—again stopping to scrape down the sides. Pour batter into the crusts. I fill completely to the top.

Bake until the filling is set, 18-20 minutes. I place a pan of water in the oven while baking. I allow the cheesecakes to set in the turned off oven with the door open a bit for about 30 minutes after baking is complete. I then allow them to cool on the counter for another 30 or so minutes. I think the slower cooling helps prevent cracks. Cover and refrigerate for at least 3 hours before unmolding. These freeze beautifully!

I decorate the tops with a little chocolate ganache. Heat 1/3 cup heavy cream (don’t substitute any thing less!), 1 T butter, and 1 T sugar. Bring to a boil, stirring constantly. Pour boiling cream mixture over 3 ounces (about 1/4 cup) semi-sweet chocolate chips. Allow to stand for 3-4 minutes. Stir until smooth. Pour onto tops of cheesecakes and smooth evenly.

Monday, January 25, 2010

Bunny Bean Bags


This adorable little bunny bean bags are used for a easy and fun toss game. Just use a bucket or bowl and then put a line on the floor. Then have the kidos attempt to toss the bunny's into the bucket.
Found this idea at www.onebraftyplace.com

Marshmellow Gun


Things You'll Need:
For eack marshmallow gun:
about 3 feet of 1/2 inch diameter PVC pipe, thick walled, (schedule 40)
PVC pipe fittings:
two 90 degree elbows
two "T" connectors
two caps
a hack saw or PVC pipe cutter

Instructions:
Step 1: Marshmallow gun drawingClick on the picture of the gun. Take a quick look at the drawing. Get an idea of how to assemble the marshmallow gun. Make a list of the supplies you will need. Take a $10 bill and head for the hardware store.

Step 2: PVC Pick up a 10' piece of 1/2" schedule 40 PVC pipe: usually under two bucks.
For 3 marshmallow guns get connectors: 6 "T" connectors, 6 90 degree elbows, and 6 caps. Each connector costs about 30 cents. Total cost for PVC pipe and connectors for 3 marshmallow guns = $8.40

Step 3: PVC Elbow connectorBring your supplies home and cut your PVC pipe. For each marshmallow gun you will need:
- 2 7" lengths of pipe
- 5 3" lengths of pipe
The easiest way to cut PVC pipe is with a PVC pipe cutter, but I used a chop saw. A hack saw will work just as well.

Step 4: PVC capAssemble the marshmallow gun, as shown in the drawing. You don't need any glue or special tools. You just push one piece into the next. Resist the urge to glue the pieces together. If, by chance, a marshmallow gets stuck in the gun, you can easily disassemble and remove your stray ammo.

Step 5: To shoot the gun, place one marshmallow just inside the mouthpiece. Seal your lips around the mouthpiece and give a good hard puff. You will be amazed at how far you can shoot a marshmallow with one of these guns. Get in a little target practice before you engage in MARSHMALLOW WAR!

Step 6: Feel free to trick out your weapon with a laser site or camo paint. You and your friends or kids will have a blast with this inexpensive, incredibly fun toy gun!
*****
There is a really good tutural at theidearoom.blogspot.com on how to make a mini-marshmellow gun and eye mask. It is really cute!

Travel Felt Board


Directions:
It's not really a board, rather it's a piece of fabric I backed with iron vinyl and then sewed to a piece of felt. The vinyl is essential to keep the backside from getting all dirty, especially at restaurants while we wait for our dinner at fancy shmancy places like Chilis, because I really don't want every meal out to come on a plastic tray!

To make one is really simple and I've improved the design since making mine to include a ribbon closure:

Cut a piece of fabric to the same size as your piece of felt, I just used the very inexpensive felt sheets that come pre-cut. They are the perfect size for rolling up and keeping in your bag without taking up too much room.


Cut piece of iron on vinyl to the same size as your fabric. Follow the directions on the package and iron onto the right side of the fabric. Let it cool off before moving on.


I found iron-on vinyl sold by the roll in a plastic bag on the notions wall at Joann's Fabric, a large nationwide fabric and crafting retailer. Watch for special sales where the entire notions wall is 40-50% off and same yourself some money!
----
Pin and sew vinyl covered fabric to felt, with vinyl covered side facing the felt. Before beginning attach ribbon.

On one side pin a piece of ribbon folded in half so that the loose ends are sandwiched inside between the vinyl covered side of the fabric and felt. Leave a bit of the loop formed when folding the ribbon in half sticking out between the pieces of fabric. When you are sewing around your "board" catch the ribbon and sew firmly into place by sewing over, back-stitching, and then forward stitching over it. This will become your tie.

Turn inside out and sew opening shut. My beginner skills are evident by the obvious stitching up the bottom right side on the one above but it still looks cute all rolled up! Use fabric scraps to make the felt shapes and you're in business! Your toddler is kept busy, and when she's all done just roll up the whole thing, tie closed, and now you don't even need a plastic bag to keep it in!


Found this great idea at katiesnestingspot.blogspot.com

Pencil & Drawing Pad Holder

This is a fun colored pencil and drawing pad holder made from an old pair of jeans. This is a such a cute idea. You can get more images of how to make it at www.skiptomylou.org
Inside with plenty of space for all the pencils and a note pad.

Felt Brown Paper Bag Lunch


This is a fun felt brown bag with all of the goodies.

The Brown Paper Bag

You need two pieces of light brown felt. Cut a square out of the bottom corner on each side. With pinking shears trim across the top. Trim just enough to pink the top. Sew across the bottom and along each side. Then Pinch the side and bottom together and sew. And then its Finished!

The Chip Bag and Chips

Cut two pieces of felt. Embellish the front with stripe and medallion. I meant to embroider "chips" in the white circle. You could also write chips with a paint marker. Then place right sides together and stitch along each side. Turn right side out and then stitch across the bottom. I used a blanket stitch along with a couple rows of stitching. Next cut chips out of yellow felt. Stitch together close to the edge. You can add rows of stitching to make them 'ruffled' chips if you like.


The Ho Ho

Cut 2 pieces if dark brown felt and two pieces of white felt. Then place the pieces together and sew around the outside edge, leaving an opening for turning on the short side. Next turn right side out. Top stitch around the edge on the white piece only. Don't worry about closing the openings--they will be in the center. Place the white piece on top of the dark brown (bottom edges lined up) and roll up. And finally slip stitch the roll closed along the outside edge.

The Sandwich

Cut two pieces of off - white fabric and a strip of light brown felt about. You might need to attach two pieces together.
Sew the strip to one side of the white square overlapping the ends.Sew the white square to the other side leaving an opening for turning.Turn right side out. Stuff with polyester fiberfill and slip stitch opening closed.

Make ingredients for your sandwich by sewing two of each color together. You can sew around the edge leaving an opening for turning, turn and topstitch or just sew the pieces together (this is how I made them except for the bologna which I turned). Add details with your machine.

This Idea was from www.skiptomylou.org

Felt Easter Goodies


This are so cute! I just love these little felt peeps. And the cute little Easter basket is so good you could almost eat it. LOL

Found this great idea at a blog called Dusty Bottom Acres.

Cardboard box Kitchen


Materials:
Large cardboard box(es)
Masking Tape
Paint or paper
Twine, rope, or ribbon
Top of ketchup, milk carton, or other small lids
Utility knife
Markers
Old CDs
Bowl for sink
Plastic piping
Glue

Instructions:
Step 1: Finding boxes
Finding cardboard boxes is easy. Go to the local grocery or electronics store and ask for their discarded shipping boxes. Have an idea of which kitchen appliances are going to be made and get a variety of sizes and shapes to match. A tall box could be used for a refrigerator or laid on its side for a sink and counter. Smaller boxes can be used as a microwave or over-the-sink cabinet. This is where the 'child in the adult' comes alive with imagination.

Step 2:Play Kitchen Appliances
Tape the boxes shut with masking tape and arrange them, in the area where they will be played with, in a basic shape of a kitchen. Use the kitchen layout in the house to create a realistic atmosphere. When the boxes are in place then decide which boxes will be transformed into what kitchen appliance

Step 3: Complete Play Kitchen Set
Use paint, construction paper, or butcher paper to cover the exposed area of the boxes. Let the kids helps since making the play kitchen is half the fun. With a utility knife cut the holes for the kitchen sink, the oven, microwave, refrigerator doors, and any cupboard (explained below). Begin adding detail to each box with these suggestions.
• Use old cake pans, plastic storage containers, or pre-formed tin cooking pans for the kitchen sink. Trace around the sink container and cut a hole a little smaller. Use plastic piping for the faucet and glue covers from milk cartons on either side for the hot and cold controls.
• Glue four old CDs on the top of the box for the stove top. Use covers from old ketchup bottles as the burner controls and add temperature control marks (off, low and hot) on the box surrounding the controls.
• For the oven, on the front side of the box, cut across the top and ½ way down on both sides, to form the oven door. Place tin foil on this pull down door to represent the window to look through. With a screwdriver punch two holes at the top of the door and use heavy string, twine, or ribbon to make the pull down handle. Put a knot at one end, poke out through one hole and over to the other. Poke in through the second hole and tie another knot.
• A bottom cupboard is made with a box that is on its side or at a height correct for the child to use as a work space. Use a marker to show where the doors would be and be creative with the pull knobs. Do not cut the doors so this box remains firm.
• Place a box for the microwave on the cupboard. Starting in the middle of the box cut across the top, bottom and the right side to create the door. Use your choice of a knob or pull for the handle. On the left side use a marker to draw buttons with numbers on them and other controls such as 'Defrost' and 'Popcorn'. Make sure there is a box drawn for the clock/timer.
• Elaborate on the refrigerator as much as wanted. Cut the door and put a handle on it or cut out small ovals to pull the door open. Inside stack several boxes on top of each other, each with the front cut out. This will create shelves inside.

Rolled up Kitchen Mat


Materials:
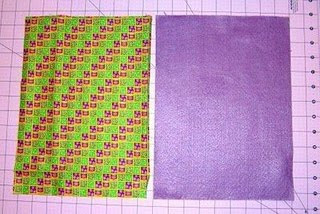
A piece of wool felt 17.5″ x 9.5″. (Two pieces if you’re going to be hand sewing. Just one if you’re machine sewing.)
A piece of cotton print fabric 17.5″ x 9.5″. (Skip this if you’re hand sewing.)
A 23″ long length of ribbon.
Assorted wool felt scraps for the burners, knobs, sink, and faucet pieces. See pattern for how large the pieces are.
Matching thread.
embroidery thread for hand sewing the kitchen items onto the playmat and/or hand sewing the playmat to its backing


1. Cut & Pin:

Cut the burners, knobs, faucet pieces, and sink out of your choice of wool felt colors and arrange on your 17.5″ x 9.5″ piece of wool felt. Make sure you leave enough room around the edges for sewing the playmat to its backing, you want there to be a bit of a border left after you sew, plus allow for the 1/4″ seam allowance (if you’re machine sewing).

Pin in place… I know my printed fabric is shown underneath in the photo, but ONLY pin through the wool felt. (And only pin through ONE layer of wool felt if you’re hand sewing everything.)

Sew the kitchen elements on
You can sew the kitchen pieces to the wool felt however you wish. My new sewing machine has a blanket stitch so I used that. You can just do a straight stitch or a zig zag if you’d like. Sewing wool felt pieces by hand is quite enjoyable if you like handiwork. You can use embroidery thread and stitch everything on by hand either by a running stitch or a blanket stitch, however you wish.

2. Stitch playmat and ribbon tie
After all the kitchen elements are sewn on, you’re going to want to stitch the playmat to its backing.

If you’re sewing with a machine:
Lay your wool felt playmat piece right sides together on top of your printed cotton fabric and square up the edges if you need to

Pin pieces together inserting your ribbon folded in half on one short end. Most of the ribbon should be inside the playmat pieces, pin it in there if you’re afraid of accidentally catching it in the stitching

Using a straight stitch, sew around the edge of the playmat with a 1/4″ seam allowance. Leave a 3 or 4 inch opening to turn the playmat right side out.

Clip corners and turn the playmat right side out. Use your fingers or a chopstick to poke the corners out. Iron on a warm setting if needed.

Fold the edges of the opening in, pin. Topstitch close to the edge closing the opening and going all around the edge for a neat look.

If you’re hand sewing
Lay your wool playmat piece with the kitchen elements sewn on, on top of another wool piece of the same size face up — wrong sides together. Square up if needed. Using embroidery thread, sew pieces together either with a running stitch or a blanket stitch. Your stitching will show, so if you do a running stitch, do it fairly close to the edge. Wool felt won’t fray, so don’t worry.

Don’t forget to insert your folded ribbon between the layers (folded end hidden between the layers, loose ends free to tie the roll up), on one short end of the playmat and stitch it tightly in place
******************************************
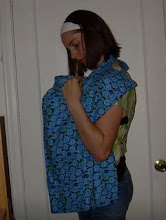
That’s it! You’ve got yourself a sweet little portable play kitchen for hours of creative play for your little ones. These would make very cute handmade Christmas gifts with a wee wooden spoon and a tiny pint-sized pan or two

alterations, changes
I always recommend using wool felt over the thin, acrylic stuff you can find in craft stores. It just holds up so much better folks. Wool blend felt is perfectly okay! If money is really tight, anything that won’t fray easily like polyester fleece would work as well. You could also make the whole thing out of cotton prints with some iron-on fusible webbing (like Wonder Under), easily found at fabric stores. You’ll just want to sew the edges down VERY WELL to avoid fraying.

You can also take it a bit further, and embroider “hot” and “cold” onto the faucet knobs, or maybe “on” and “off” on the burner knobs. It would be cute to do a red spiral stitch on the burners or even a red spiral bit of wool or fleece to make the burners look hot.

You could add a splash or a drip of water under the faucet… add a drain or some bubbles in the sink… embroider a little 3D sink action… there are lots of fun possibilities!

Found this great idea from www.balancingeverything.com

Sunday White Shirt & Tie for Baby Boy


This are so darn cute! I just love these. I can't wait to get my sewing machine fixed so I can make a ton of these to give as baby shower gifts. It is really simple to make even though if you try to buy them you will be paying at least $20. Which is rediculus! All you need is a plan white onesies, some fun fabric, wonder-under and a sewing machine. Just create a tie like pattern on some card stock and then cut out the fabric using that same shape. Iron on the wonder under to the fabric and then iron on to the shirt. To make sure the fabric doesn't come off of the shirt just stitch around the tie. It looks really good if you do a really tight zizac.

bright